
 As a serious amateur photographer for more than 20 years, it was only in 1989 after suffering a disabling wrist injury in my chiropractic practice, that I turned my full attention to photography. Looking over my earlier work, I was disillusioned that much of it was already showing signs of deterioration. Despite using fiber-based papers, selenium toning, and proper storage, I realized that no matter how good my photographs might be, I was working in a medium destined to self-destruct.
 I had read numerous articles on alternative methods of photographic printmaking, searching for ways to make photographic images more archival. One of the greatest collections of photography exists at the Center for Creative Photography at the University of Arizona in Tucson. There I found platinum and palladium images of early Steichen and Weston, and newer images by Dick Arentz. I was hooked. Not only were these photographs magnificent, with a very special soft, but sharp look, but they would stand the test of time.
I could appreciate that there was a new depth of image possible with the platinotype, with the added benefits of true archival permanence. My readings also led me to believe that the process seemed complicated and difficult. Yet I have found that by adhering to several steps, platinum printmaking can be relatively simple and very rewarding. The three basic components of platinum printmaking are a shot glass, a platinum cocktail mixture, and "a little help from heaven" - the sun.
Getting Started
I wanted to work in a full continuous tone black and white process, so I chose the platinum/palladium method. Bostick & Sullivan offers a starter kit* of chemistry which includes palladium chloride, and potassium chloroplatinite. To clear the print, I use EDTA (a chelating agent to clear ferrous oxalate from the print). Platinotypes are an iron process that uses ferric oxalate in combination with the metal salts of platinum and palladium to create the image. So far so good. No need for any acids to clear prints as in the old days, no more hypo, in fact, no more darkrooms! This process can be done under a tungsten light. Since you work on watercolor paper, no more photographic paper. I initially tried and still like the Cranes platinotype and ecru paper available through B & S.
After the chemistry kit and paper, you will need a contact frame large enough to hold your negative and paper in contact. The easiest light source to begin with is the sun. If you live in the Southwest as I do, this is a fairly dependable source. If you live in London or Seattle, an old GE sun lamp or facsimile will work just fine for small format images.
The Negative
Platinotypes are a contact print process, meaning that your image is as large as your negative. They also can print in a much wider density range than silver. Search your negative drawers to find ones that look very dense. Almost bulletproof. These are going to be the negatives that will print the best. I began with a lot of 2 Ľ negatives for experimentation. You will be amazed how many 2 Ľ platinum/palladium prints you can make with the starter chemistry set.
Contrast
The platinotype has a great control over contrast. But you must have a negative that is not too thin. Many silver negatives that print on # 2 paper are too thin. Two separate solutions of ferric oxalate will be mixed - the one that has chlorate added to it will affect contrast.
There are essentially 13 different grades of contrast that can be used. Working from negatives developed for silver printing, a number # 7 emulsion is a good starting point.
EMULSION CONTRAST CHART |
|---|
| SOLUTION NO. | SOLUTION A | SOLUTION B | SOLUTION C |
|---|---|---|---|
| #1 | 12 | 0 | 12 |
| #2 | 11 | 1 | 12 |
| #3 | 10 | 2 | 12 |
| #4 | 9 | 3 | 12 |
| #5 | 8 | 4 | 12 |
| #6 | 7 | 5 | 12 |
| #7 | 6 | 6 | 12 |
| #8 | 5 | 7 | 12 |
| #9 | 4 | 8 | 12 |
| #10 | 3 | 9 | 12 |
| #11 | 2 | 10 | 12 |
| #12 | 1 | 11 | 12 |
| #13 | 0 | 12 | 12 |
SOLUTION A= Ferric Oxalate
SOLUTION B=Ferric Oxalate with Chlorate
SOLUTION C= Platinum & Palladium
 The drops of the metals (solution C) always equals the number of drops in solutions A plus B. Within C, you can mix platinum and palladium however you would like.( ie. all palladium, all platinum, or a mix of each). For reasons of cost and affect, I use three or four palladium for each platinum. While platinum is four times the cost of palladium, platinum gives more contrast than does palladium. Palladium adds a warm tone and fine grain to the print. A small quantity of platinum will give a deeper black to your image. If you use 24 drops as in this formula, you will be able to hand coat an image about 5 x 7 inches in size. If you are going to be doing 2 Ľ images, cut the formula in half.
The Coating Process
Prepare your paper to be coated by securing it with a few small pieces of masking tape. Once the chemistry has been measured into the shot glass, swirl it, then spill it quickly onto the paper. Spread the emulsion out evenly (using a foam brush or non-metallic Hak brush) covering each area of the paper three or four times. Mark the four edges of the area you want to coat with a tiny pencil mark. Or you can use construction paper or rubylith to create a mask for a clean edge. Many will overcoat the image size by one inch or so to show the negative edge. Others will coat inside the negative edge to make the image float. The latter conserves emulsion materials. Stop spreading once the emulsion becomes tacky. Brushing more than necessary will cause streaks and abrade the surface of the paper.
Dry your paper by putting it in a dark closet for a few hours, or use a hairdryer on a warm setting to accelerate drying. To ensure that it is dry, take your hand, while dry, and run it across the paper in all corners. A paper with moist emulsion will ruin your negative. All platinum printers have lost at least one negative this way, so take care on this last step.
Printing
Take the paper, put the negative on top of it (notches on the left for large format shooters), put it into a contact frame with clean glass and seal it up. Using the sun as a light source, take a meter reading of its value (for reference during your printing times). As the value of your sunlight goes up, printing time in the sun will shorten. As the value goes down, printing times will increase. Do a test strip just as you would in silver printing. Clouds will definitely effect exposure and contrast. Let's say you estimate a starting value for exposure in the sun at four minutes (Tucson, Arizona sun) at 11:30 in the morning. I would test at one minute intervals from three to six minutes. A slight latent image is visible after exposure.
Developing
To develop is simple. Density of image is determined only by exposure, not by development. Development will be visible instantly. Dam the developer (ammonium citrate) to one end of an 8x10 tray, slip your print face up into the base of the dam, and drop the tray to the level. This is a great thrill and the moment of truth for much of your work. Leave the paper in the developer for 30 or 40 seconds. The developer becomes slightly toxic as it builds up with platinum/palladium solids so rinse fingers after handling . Lift the paper out with two hands, draining the developer off the sheet, and put in the clearing agent (EDTA) for about five minutes. You will have two or three successive 8x10 trays of EDTA (non toxic) to remove the yellow stain out of the paper. Your last tray should stay clear. After 15 minutes of EDTA clearing, wash with clear water. Depending on the paper your use, fifteen minutes to one hour of washing is sufficient.
After washing, lift the print with two hands (saturated paper is soft and will tear easy) and put it on blotter paper or fiberglass screens to dry. This will vary by region (Arizona is three or four hours). Or speed dry with a hair drier.
With the print in front of you, you will notice that the final density is slightly darker than when it was wet on development. The details in the print will pop in the last elements of drying as the paper stiffens up. Voila!
You can experiment with small format cameras by piecing three or four exposures together so that you can make a larger image. If you don't have access to an enlarged negative, make a good silver print of the smaller negative image and have a blueprint house make you a high contrast enlarged negative for about $15.
Good luck. I know that you will have great fun and success with this very beautiful and permanent process.
Bostick & Sullivan
P.O. Box 16639
Santa Fe, NM 85706-6639
Tel: 505 474 0890
Email richsul@roadrunner.com
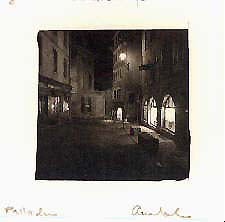
2. Old Town Geneve, 1989 2 Ľ , palladium print,
Cranes platinotype paper. 12 drops #6; 6 drops palladium
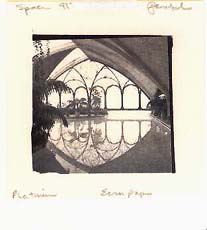
3. Burgos pool, Spain, 1989 2 Ľ , platinum print,
Cranes ecru paper. 12 drops, #7; 6 drops platinum
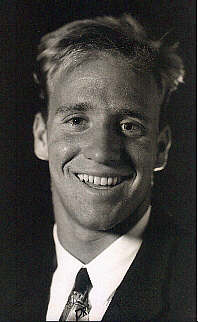
4. Young Grad, Tucson, 1992 7x9 platinum palladium print.
Cranes Platinotype paper 48 drops, #3, 12 drops platinum,12 drops palladium